

Learn 3-Phase AC Motor winding process, star-delta connection, and formula in this easy guide – complete rewinding and connection explained clearly.
Introduction
A 3-Phase AC Motor is an induction motor like a single-phase motor, but it operates on a three-phase supply. This gives it a relatively high operating capacity.
Working Principle – Mutual Induction
This induction motor operates on the principle of mutual induction. When a short-circuited conductor is placed in a rotating magnetic field, the conductor begins to rotate. When several such conductors are mounted on a rotor and placed in the field, the rotor begins to rotate as a whole.
For this reason, three-phase induction motor is the most widely used motor.
Supply System aur Connections
- A 3-Phase AC Motor gets a three-phase supply.
- Separate circuits are made for the stator winding.
- The motor is operated in both Star Connection and Delta Connection.
Starting Mode – Star Connection
- When the motor starts, the first star connection is used.
- In this mode the motor draws less current.
- The effect of overload on the supply line is reduced.
Running Mode – Delta Connection
- When the motor picks up speed, it is shifted to delta connection.
- In Delta mode the motor runs smoothly on the load by taking required voltage and normal current.
Role of Capacitor
- There is no capacitor in 3-Phase AC Motor rewinding.
- If a capacitor is installed then its purpose is only to improve the power factor (P.F.).
Protection Systems
- If one phase of the supply is lost, the motor may overheat and burn.
- To avoid this, starters are installed –
- Star-Delta Starter
- Automatic Star-Delta Starter
- Relay Protected Starter
These starters immediately shut down the motor in case of any abnormal condition.
Types of 3-Phase AC Motors
- Synchronous Motor –
- In which the speed of the rotor and supply poles is the same.
- The rotor and magnetic poles rotate at the same speed.
- Asynchronous (Induction) Motor –
- The speed of the rotor is less than the speed of the poles.
- There is always slip in this (pole speed > rotor speed).
Single Phase vs Three Phase _6 Amazing Motor Winding Facts
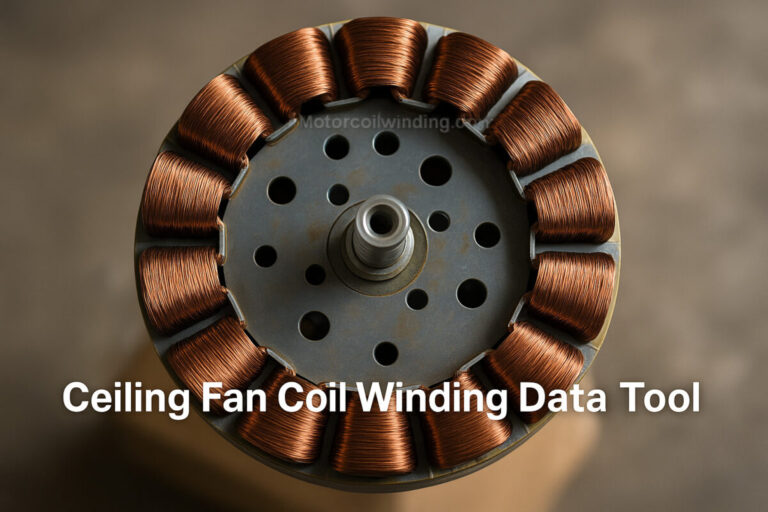
Free to use Motor coil winding data tool
Important things to consider before rewinding 3-Phase AC Motor
Before rewinding the motor, write on a piece of paper:
- Number of coils
- Number of Poles
- Number of Slots
- Connection type
- Per coil turns (number)
- Coil ka size
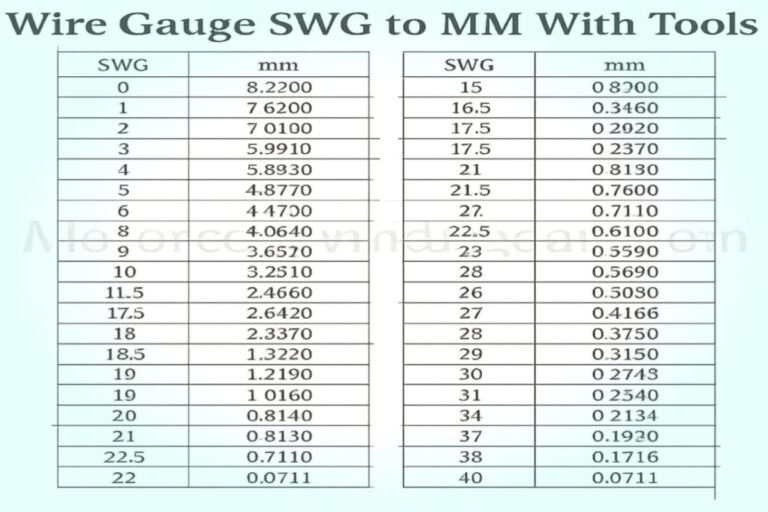
- Wire gauge
- Pitch distance
3-Phase AC Motor Practical process of rewinding
- Removing old winding
- The plastic guard or wooden packaging inside the slot has to be removed.
- Using a screwdriver and hammer, the plastic guard or wooden packaging is slowly removed.
- It is easy to apply heat to remove old copper wire.
- Slot Cleaning and Insulation
- Clean all the slots.
- Place insulating material (film paper, glass sheet, autocater) in each slot.
- Winding new coils
- Make coils according to gauge, turns, size and pitch.
- Both hand winding or farma winding methods can be used.
- After putting the coils in the slot, do cotton taping.
- In medium motors, only the part outside the slots is taped.
In large motors the entire winding is cotton taped. - Installing slot packaging guards
- After inserting the coil into the slot and tapping them, plastic guard or wooden packaging is placed in the slots. Simply cut wooden packaging of the same size as the slots with the help of a knife and hammer it on top with the knife. Now place the pliers on one edge of the slots and hit them slowly with your hand. This will push the wooden packaging to the other end of the slot. Keep in mind that the pliers should not be inserted into the slot forcefully. Doing so may cut the coil wires.
3-Phase AC Motor Poles versus Slots
- In 3-phase motors the poles are always multiples of 2.
- Example:
- 2800 RPM → 2 poles
- 1440 RPM → 4 poles
- 960 RPM → 6 poles
- 700 RPM → 8 poles
As the poles increase, the speed of the motor decreases.
3-Phase AC Motor Pitch Calculation
Pitch = Total Slots ÷ Poles
Example:
- 3-Phase AC Motor with 36 slots and 4 poles = 36 ÷ 4 = 9.
- Normal pitch = 1–9.
- Long pitch = 1–10.
- Short pitch = 1–8.
AC Motor Rewinding Formula
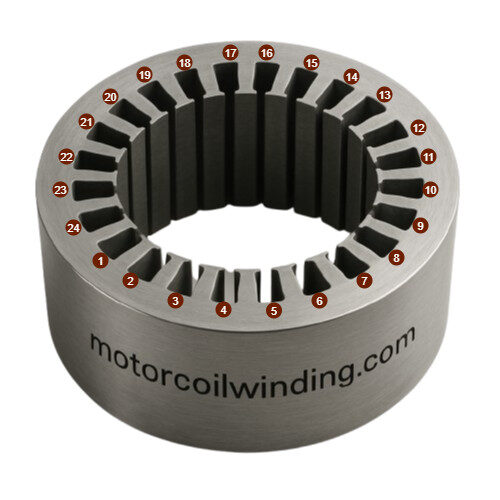
3-Phase AC Motor Slot Layout and Coil Direction
- Slot numbers always start counting from “1”.
- Slots are generally even numbered.
- The direction of insertion of the coil can be clockwise or anticlockwise – but the entire coil should be inserted in one direction only.
3-Phase AC Motor Single Layer Winding
- There is only one coil side in a slot.
- The total winding count is equal to half of the slots.
Slot-wise Single Layer Coil Setting:
- Now take the second coil. Place one side of this coil in slot number 3, leaving slot number 2. (1st coil also)
- Now from slot number 3 to 8 slots will be counted so it will come in slot number 10. Put the other side in slot number 10. (2 coils also)
- Now leave slot number 4 and insert it in slot number 5 and slot number 12. (3 coils also)
- Leave slot number 6 and insert it in slot number 7 and slot number 14. (4 coils also)
- Leave slot number 8 and insert it in slot number 9 and slot number 16. (5 coils also)
- Leave slot number 10 and insert them in slot number 11 and slot number 18. (6 coils)
- Leave slot number 12 and insert it in slot number 13 and slot number 20. (7 coils also)
- Leave slot number 14 and insert it in slot number 15 and slot number 22. (8 coils also)
- Leave slot number 16 and insert them into slot number 17 and slot number 24. (9 coils also)
- Leave slot number 18 and insert them into slot number 19 and slot number 2. (10 coils also)
- Leave slot number 20 and insert it in slot number 21 and slot number 4. (11 coils also)
- Leave slot number 22 and insert it into slot number 23 and slot number 6. 12 also coil
In this way, one side of the coil fits into each of the 24 slots. The slots are numbered from 1 to 24.
3-Phase Motor Winding Connection
Single Layer Coil Connections 3-Phase AC Motor
In a 3-phase motor, separate groups of three phases are made.
Connection points of the first phase:
- Leave the end of the coil at slot number 1 empty.
- Connect the end at slot number 8 to the end at slot number 14.
- Connect the end at slot number 7 to the end at slot number 13.
- Connect the end at slot number 20 to the end at slot number 2.
- Leave the end at slot number 19 empty.
In this way the connection of the first phase coils is completed.

Second Phase Connections:
- Leave the end of the coil at slot number 3 empty.
- Connect the end at slot number 10 to the end at slot number 16.
- Connect the end at slot number 9 to the end at slot number 15.
- Connect the end at slot number 22 to the end at slot number 4.
- Leave the end at slot number 21 empty.
In this way the connection of the second phase coil is also completed.
Third Phase Connections:
- Insert the empty end of the coil with slot number 5.
- Connect the end of slot number 12 to the end of slot number 18.
- Connect the end of slot number 11 to the end of slot number 17.
- Connect the end of slot number 24 to the end of slot number 6.
- Leave the end at slot number 23 empty.
In this way the connection of the third phase coils is completed.
In this way, separate groups of three phases are formed.
Detail of the remaining Wire heads of the Coils.
After connecting the coils, a total of 6 ends remain empty.
- The starting head of the coil of slot number 1.
- The beginning end of the coil of slot number 19.
- The beginning head of the coil of slot number 3.
- The beginning end of the coil of slot number 21.
- The beginning head of the coil of slot number 5.
- The beginning end of the coil of slot number 23.
We can make two types of connections with this 6 Head end wire.
- Star Connection
- Delta Connection
3-Phase Star Delta Connection
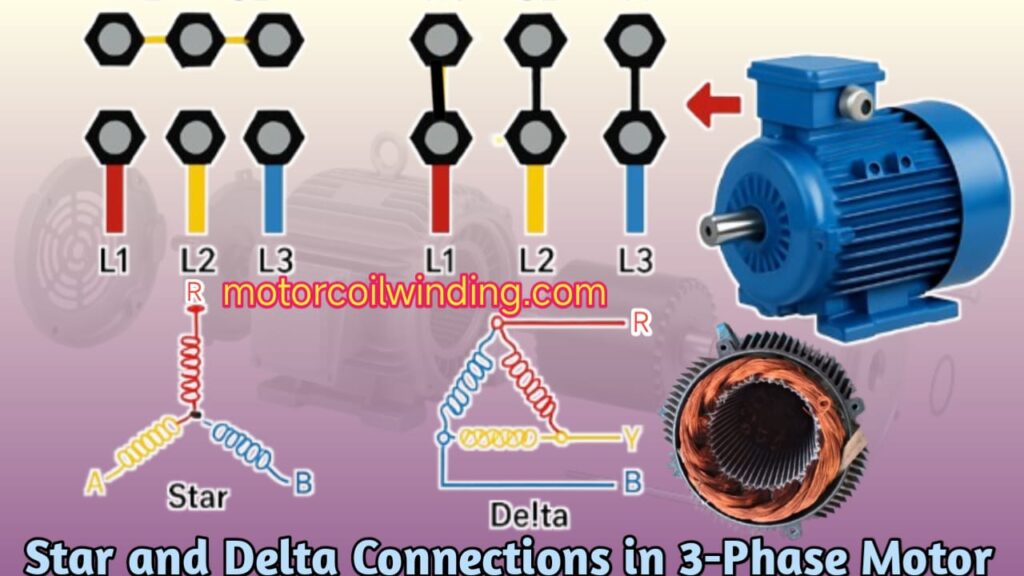
Star Connection
- Joining the remaining ends to form a neutral point gives 3 phases:
- Slot 3 (B1), Slot 19 (A2), Slot 23 (C2) → add together.
- Slot 1 (A1) → Phase 1
- Slot 5 (C1) → Phase 2
- Slot 21 (B2) → Phase 3
Delta Connection
- Join the ends of the coils in a triangular form in the Delta pattern:
- Slot 1 (A1) → Slot 21 (B2) → Phase 1
- Slot 3 (B1) → Slot 23 (C2) → Phase 2
- Slot 5 (C1) → Slot 19 (A2) → Phase 3
This creates a complete delta connection.
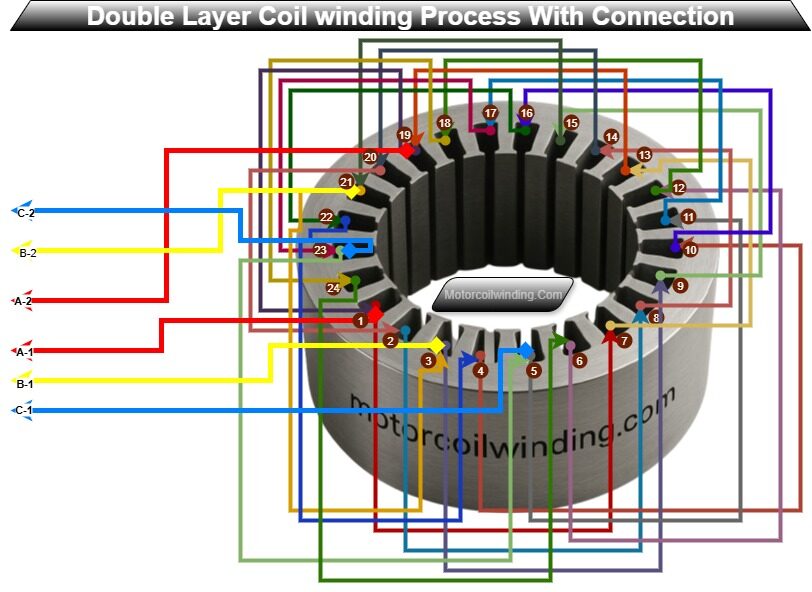
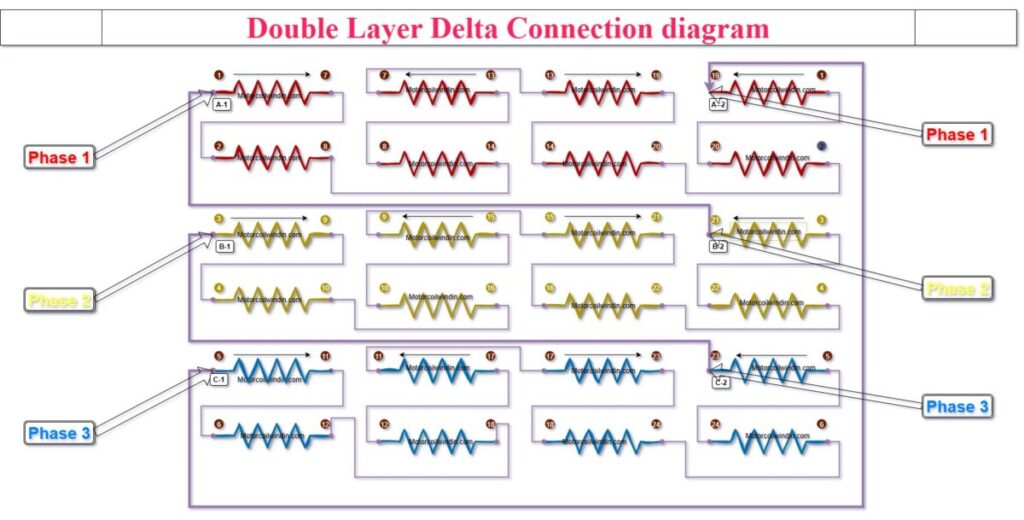
3-Phase AC Motor Double Layer Winding
Consider a 4-pole, 1-7, and 24-slot motor with 24 coils. The number of coils in each phase circuit is 8.
- Each slot has 2 coil sides.
- Example: 4 pole, 24 slot motor = 24 coil windings (8 windings per phase).
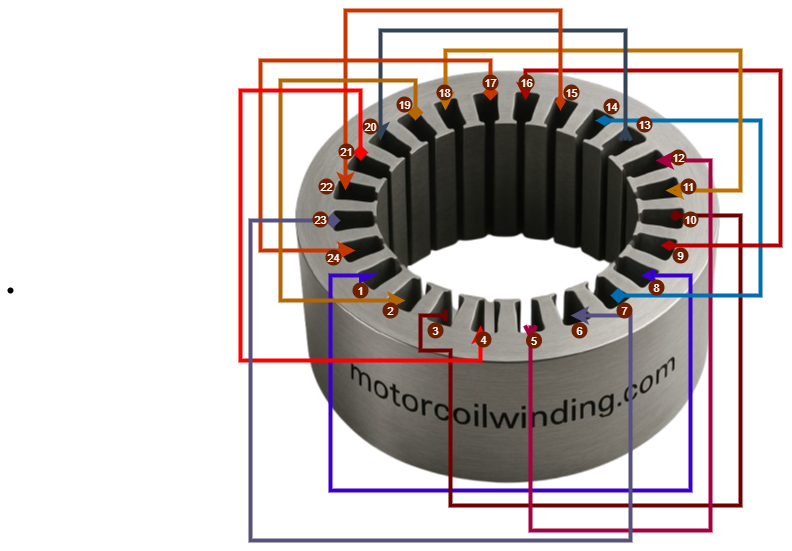
Double Layer Slot-wise Setting (Example):
3-Phase Motor In Double Layer Winding, the coil is not inserted leaving one slot, but is inserted in each slot.
In this winding, one side of each of the two windings of a slot is inserted,
In Slot No. 1 insert (1 also) one side of coil and other side in slot No. 7,
In Slot No. 2 insert (2 also) one side of coil and other side in slot No. 8,
In Slot No. 3 insert (3 also) one side of coil and other side in slot No. 9,
In Slot No. 4 insert (4 also) one side of coil and other side in slot No. 10,
In Slot No. 5 insert (5 also) one side of coil and other side in slot No. 11,
In Slot No. 6 insert (6 also) one side of coil and other side in slot No. 12,
In Slot No. 7 insert (7 also) one side of coil and other side in slot No. 13,
In Slot No. 8 Insert (8 also) one side of coil and its opposite side in slot number 14,
Insert (9 also) one side of coil and its opposite side in slot number 15,
Insert (10 also) one side of coil and its opposite side in slot number 16,
Insert (11 also) one side of coil and its opposite side in slot number 11,
Insert (12 also) one side of coil and its opposite side in slot number 18,
Insert (13 also) one side of coil and its opposite side in slot number 19,
Insert (14 also) one side of coil and its opposite side in slot number 20,
Slot no Insert one side of the coil (also 15) in slot number 15 and the other side in slot number 21,
Insert one side of the coil (also 16) in slot number 16 and the other side in slot number 22,
Insert one side of the coil (also 17) in slot number 17 and the other side in slot number 23,
Insert one side of the coil (also 18) in slot number 18 and the other side in slot number 24,
Insert one side of the coil (also 19) in slot number 19 and the other side in slot number 1,
Insert one side of the coil (also 20) in slot number 20 and the other side in slot number 2,
Insert one side of the coil (also 21) in slot number 21 and the other side in slot number 3,
Insert one side of the coil (also 22) in slot number 22 and the other side in slot number 4,
insert one side of the coil (also 23) in slot number 23 and the other side in slot number 5,
insert one side of the coil (also 24) in slot number 24 and the other side in slot number 6.
(Example)
| Slot to | Slots |
|---|---|
| Slot 1 | Slot 7 |
| Slot 2 | Slot 8 |
| Slot 3 | Slot 9 |
| Slot 4 | Slot 10 |
| Slot 5 | Slot 11 |
| Slot 6 | Slot 12 |
| Slot 7 | Slot 13 |
| Slot 8 | Slot 14 |
| Slot 9 | Slot 15 |
| Slot 10 | Slot 16 |
| Slot 11 | Slot 17 |
| Slot 12 | Slot 18 |
| Slot 13 | Slot 19 |
| Slot 14 | Slot 20 |
| Slot 15 | Slot 21 |
| Slot 16 | Slot 22 |
| Slot 17 | Slot 23 |
| Slot 18 | Slot 24 |
| Slot 19 | Slot 1 |
| Slot 20 | Slot 2 |
| Slot 21 | Slot 3 |
| Slot 22 | Slot 4 |
| Slot 23 | Slot 5 |
| Slot 24 | Slot 6 |
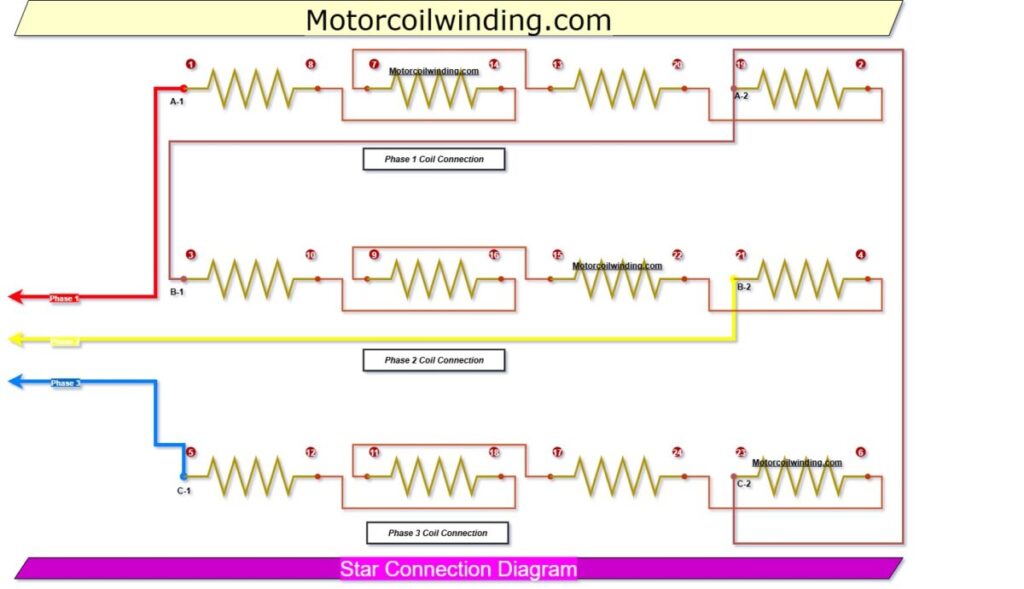
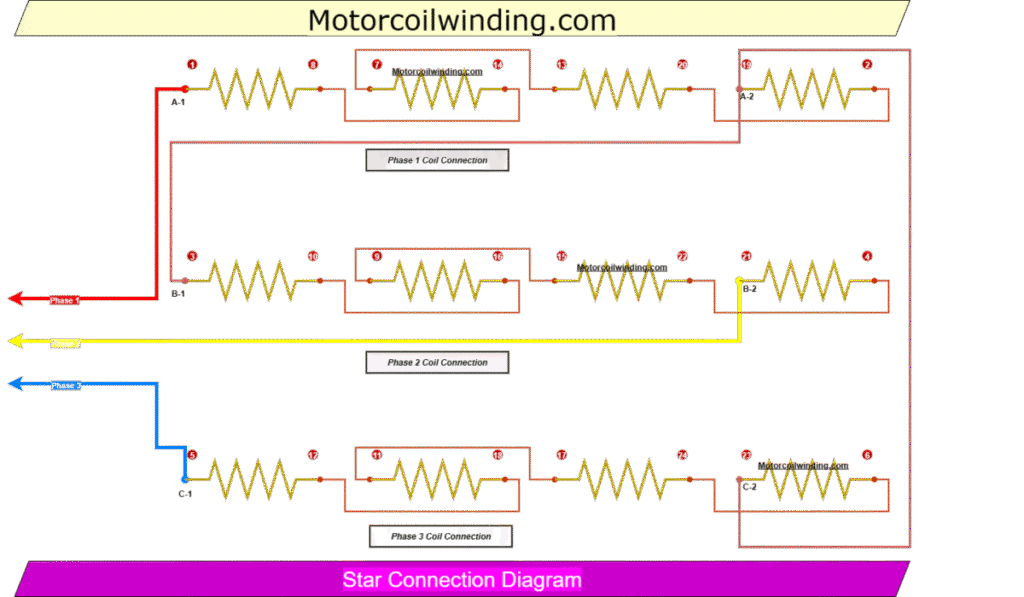
3-Phase AC Motor Double Layer Winding Connections
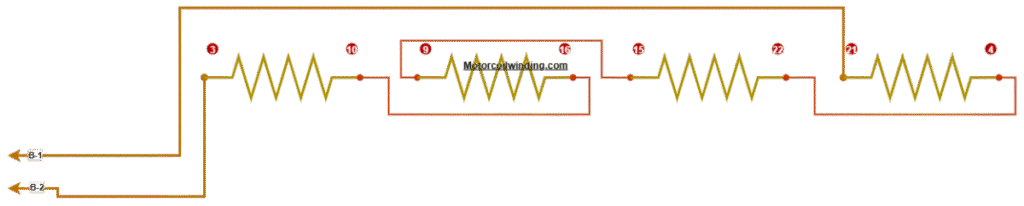
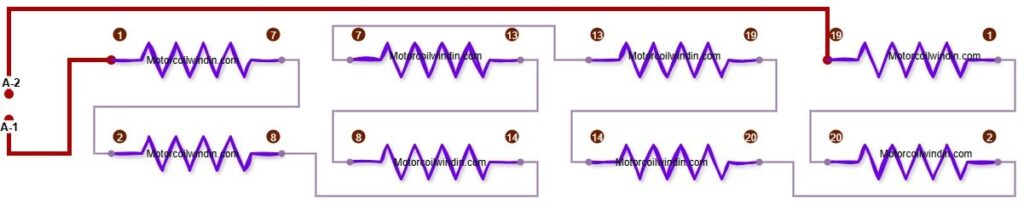
3-Phase AC Motor First Phase Connection:
- Leave the starting end of 1 coil empty.
- Connect the last end of the 1st coil to the starting end of the 2nd coil.
- Connect the last end of the 2nd coil to the last end of the 8th coil.
- Connect the starting end of the 8th coil to the last end of the 7th coil.
- Connect the starting end of the 7th coil to the starting end of the 13th coil.
- Connect the last end of the 13th coil to the starting end of the 14th coil.
- Connect the last end of the 14th coil to the last end of the 20th coil.
- Connect the starting end of the 20th coil to the last end of the 19th coil.
- 19. Leave the starting end of the coil empty.
Three-Phase Motor Winding Diagram
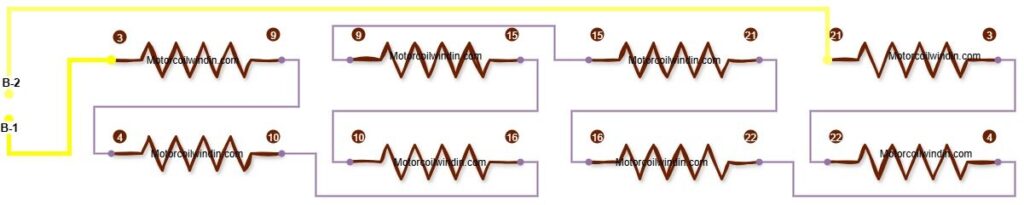
3-Phase AC Motor Second Phase Connection:
- 3. Leave the starting end of the coil empty.
- Connect the last end of the 3rd coil to the starting end of the 4th coil.
- Connect the last end of the 4th coil to the last end of the 10th coil.
- Connect the starting end of the 10th coil to the last end of the 9th coil.
- Leave the starting end of the 9th coil. Connect it to the starting end of the 15th coil.
- Connect the last end of the 15th coil to the starting end of the 16th coil.
- Connect the last end of the 16th coil to the last end of the 22nd coil.
- Leave the starting end of the 22nd coil. Connect it to the last end of the 21st coil.
- 21. Leave the starting end of the coil empty.
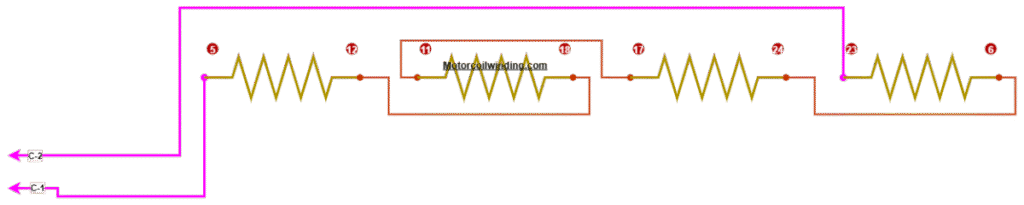
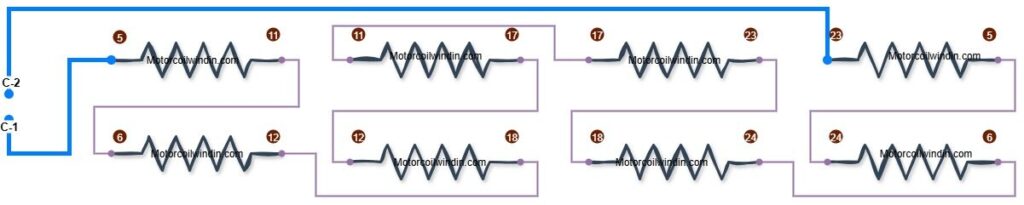
third phase connection:
- 5. Leave the starting end of the coil empty.
- Connect the last end of the 5th coil to the starting end of the 6th coil.
- Connect the last end of the 6th coil to the last end of the 12th coil.
- Connect the starting end of the 12th coil to the last end of the 11th coil.
- Leave the starting end of the 11th coil. Connect it to the starting end of the 17th coil.
- Connect the last end of the 17th coil to the starting end of the 18th coil.
- Connect the last end of the 18th coil to the last end of the 24th coil.
- Connect the starting end of the 24th coil to the last end of the 23rd coil.
- 23. Leave the starting end of the coil empty.
After connecting the coils, a total of 6 wire head ends are left empty.
- 1The beginning of the coil.
- 19 also the starting end of the coil.
- 3 The starting end of the coil.
- 21 The starting end of the coil.
- 5 The starting end of the coil.
- 23The starting end of the coil.
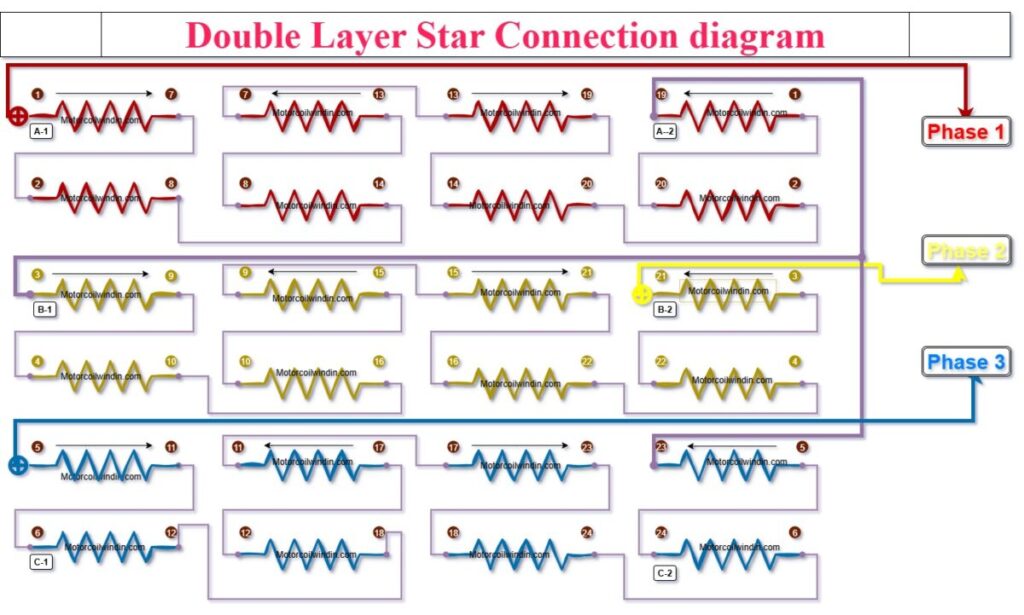
3-Phase AC Motor Star Connection
In Star connection, a neutral point is created by joining some of the remaining ends of the winding together.
- Common (Neutral): Connect the ends of Coil 3 (B1), Coil 19 (A2), Coil 23 (C2) together.
- Phase Terminals:
- Coil 1 (A1) → Phase–1
- Coil 5 (C1) → Phase–2
- Coil 21 (B2) → Phase–3
In this way the motor is connected in star.
Three Phase Motor Wiring
3-Phase AC Motor Delta Connection
In Delta connection, the ends of the winding are joined in such a way that a complete triangular loop is formed.
- Coil 1 (A1) → Coil 21 (B2) (Phase–1)
- Coil 3 (B1) → Coil 23 (C2) (Phase–2)
- Coil 5 (C1) → Coil 19 (A2) (Phase–3)
In this way the motor is connected in Delta.
Troubleshooting – What to do if the wire is broken?
- Remove the insulation from both ends (with a blade/sandpaper).
- Clean the surface by heating it.
- The wire is soldered to iodine.
- Use a sleeve or insulation tape on the joint.
people asked questions
Q1. Why is a 3-Phase AC Motor given “Star Connection”?
Ans: When the motor starts, it is run on star connection, because in this mode the motor draws less current and there is no load on the supply line.
Q2. Which coils’ ends are joined together to form a star connection?
Ans: Neutral junction is formed by joining the ends of Coil 3 (B1), Coil 19 (A2) and Coil 23 (C2).
Q3. How are different 3-Phase AC Motor terminals formed in Star Connection?
Ans:
- Coil 1 (A1) → Phase–1
- Coil 5 (C1) → Phase–2
- Coil 21 (B2) → Phase–3
Q4. For what purpose is “Delta Connection” provided?
Ans: Delta connection motors are given in normal running condition. Once the motor reaches the required speed, it is operated in delta so that it works efficiently with full voltage and normal current.
Q5. Which coils are connected together in Delta Connection?
Ans: For Delta connection, the ends of the coils are joined as follows:
- Coil 1 (A1) + Coil 21 (B2) → Phase–1
- Coil 3 (B1) + Coil 23 (C2) → Phase–2
- Coil 5 (C1) + Coil 19 (A2) → Phase–3
Q6. What is the basic difference between Star and Delta Connection?
Ans:
- Star Connection: Takes less current at the time of starting.
- Delta Connection: While running, the motor draws full voltage and normal current.
Q7. What problems can occur if the motor is started only on Delta?
Ans: The motor will draw a lot of current during starting time which can be harmful for both the supply line and the motor.
Q8. Which connection is used most often when running a 3-Phase AC Motor?
Ans: Delta Connection
Conclusion
Rewinding a 3-Phase AC Motor is a detailed and disciplined process. By carefully monitoring the poles, slots, and coil connections, the motor can be rewired efficiently and safely. Proper rewinding and connection significantly extends the motor’s life.We’ve covered the rewinding and star-delta connections of 3-Phase AC Motors in detail in this article. Now you know why a star connection is used when starting a motor and a delta connection when operating on load, how winding works, and why a protection system is necessary. If you have any other questions about this topic or motors, feel free to ask – every question teaches a new lesson.


1 thought on “3-Phase AC Motor Winding, Connection & Formula (Easy Guide)”
A really good blog and me back again.